![]()
![]()
![]()
Multimedia is the buzzword of the '90s. Although there was much talk and some work done in multimedia in the late '80s, real applications that deserved that title have come into their own in just the last few years. Today you see more and more graphics,
sound, music, and video being skillfully (and sometimes not so skillfully) woven together into the applications you buy. And this convergence of technologies is producing something beyond what you usually might think of as a PC. It is creating an
interactive television/learning station that promises to be the cornerstone of future media.
But what about today? Can multimedia applications be put together easily, without expensive hardware? The answer is yes. With a standard PC today and a sound card, Visual Basic programmers have all they need to create and distribute high-quality
multimedia applications.
And you're going to get started in this chapter. Here, I'll introduce you to an integrated and powerful control called the Media Control Interface (MCI), which enables you to play recorded sounds, music, and video from files inside your PC and even
standard media players like audio CD players, VCRs, and video disc players. All from one simple control.
Then I'll show you how to go beyond the control and access multimedia capabilities through Win32. Although I can't hope to completely immerse you in the technology of tomorrow in just one chapter, I do hope to at least get your feet wet and point you in
the right direction for your own exploration.
The great thing about Windows is that it enables you to take advantage of all the different devices that a user might have hooked up to his or her computer without having to get elbow deep in the complexities of each. This level of abstraction is made
possible through device drivers. Device drivers handle all the little details that you don't want to and provide you with a clean, simple interface to the hardware. Nowhere is this abstraction of complexity made more clear than it is in the Media Control
Interface and the MCI control.
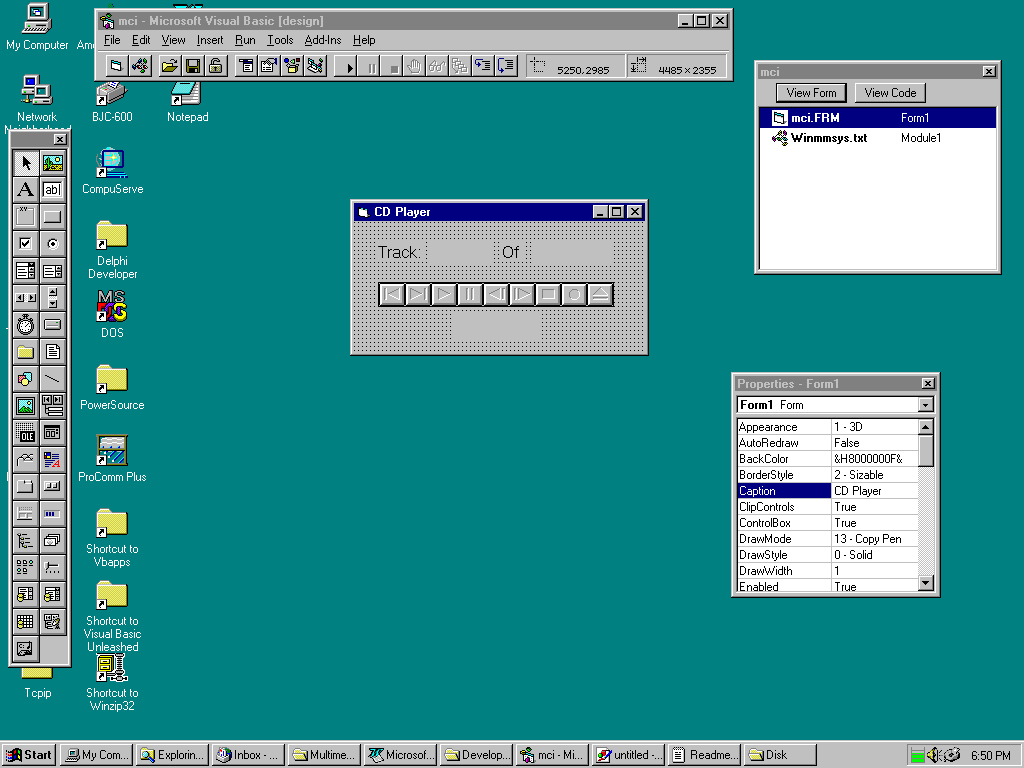
When you add the MCI control to your toolbox and then place one on your form, it doesn't immediately inspire awe (see Figure 9.1).
Figure 9.1. The Media Control Interface control on a form.
The MCI control looks like the controls you might see on a tape recorder or a CD player. Most media can be thought of as a tape player of some type. The play, rewind, fast-forward, pause, and stop controls just as easily can apply to an audio CD, an AVI
video clip, or a WAV file.
Because you probably are eager to see this control put to work, I'll walk you through creating a simple audio CD player. Of course, this process will work only if you have a CD-ROM drive hooked up to your system. If you don't... Where've you been? Go
buy one...
"But," you protest, "I already have a nifty audio CD player that came with Windows. It even starts up automatically when I drop an audio CD into my drive! I don't need to create one..."
Hmm. That may be so, but I want you to say two words with me: academic exercise. Good.
Of course, you already have an audio CD player, but suppose that you want to add functionality to it. Or suppose that you want to integrate it with another application you are writing. In these cases, you would have to have access to the guts of the
thing. And that's exactly what you'll have when you finish this little project.
To create a CD player, follow these steps:
Figure 9.2. The CD Player form.
Private Sub Form_Load()

MMControl1.DeviceType = "CDAudio"

MMControl1.Command = "Open"

End Sub
Private Sub Form_Unload(Cancel As Integer)

MMControl1.Command = "Close"

End Sub
Private Sub MMControl1_StatusUpdate()

If MMControl1.Mode = MCI_MODE_NOT_READY Then

    lblStatus.Caption = "Not Ready"

ElseIf MMControl1.Mode = MCI_MODE_STOP Then

    lblStatus.Caption = "Stop"

ElseIf MMControl1.Mode = MCI_MODE_PLAY Then

    lblStatus.Caption = "Play"

ElseIf MMControl1.Mode = MCI_MODE_RECORD Then

    lblStatus.Caption = "Record"

ElseIf MMControl1.Mode = MCI_MODE_SEEK Then

    lblStatus.Caption = "Seek"

ElseIf MMControl1.Mode = MCI_MODE_PAUSE Then

    lblStatus.Caption = "Pause"

ElseIf MMControl1.Mode = MCI_MODE_OPEN Then

    lblStatus.Caption = "Open"

End If

lblTrack.Caption = Str(MMControl1.Track)

lblTracks.Caption = Str(MMControl1.Tracks)

End Sub
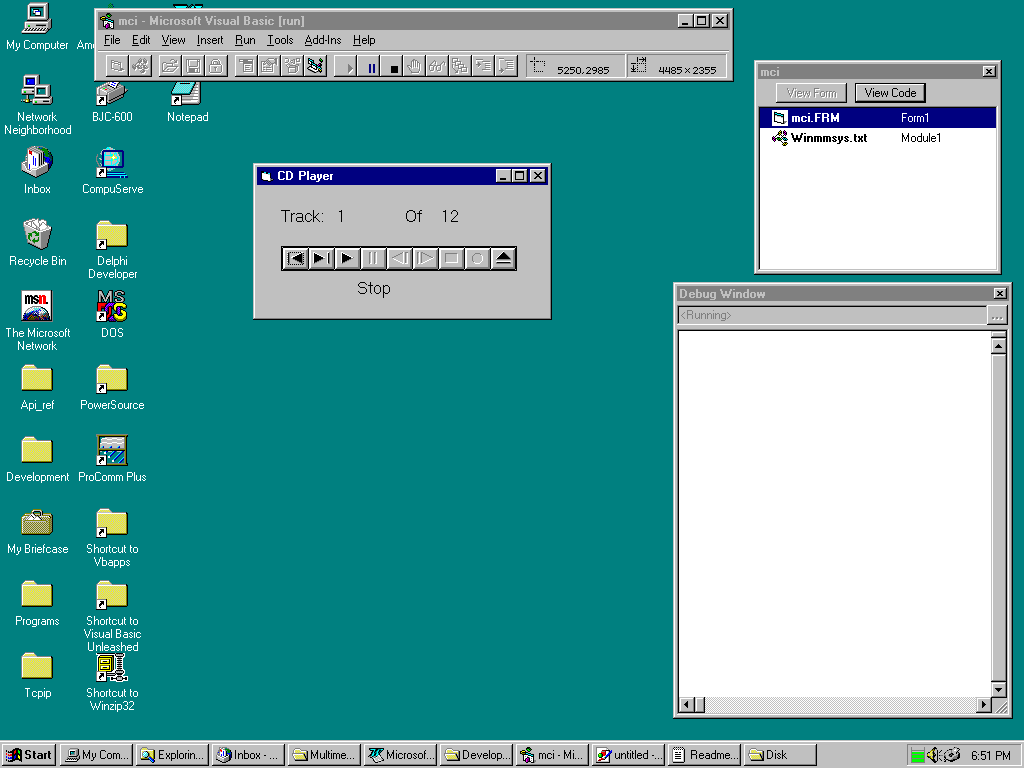
Believe it or not, you're done. Just pop in an audio CD. If the Windows automatic CD player comes up, close it right away. Then run your application. If everything goes as planned, you should see a window that looks something like Figure 9.3.
Figure 9.3. Your CD player in action.
What are you waiting for? Click Play! Try out the Skip to Next Song button (the arrow pointing to a line on the right). And the Previous Song button. Stop, Pause, and Eject should work, too. Pretty impressive for a few lines of code, aye?
Notice how the buttons change, depending on which are disabled and which are available. This is a handy feature, and it is automatic. Well, almost automatic. You have to make sure that the MCI control's AutoEnable property is True. But because that's
the default, you're set.
Your MCI can control two classes of devices. The audio CD, along with the VCR and video disc player, are called simple devices. WAVs and AVIs are referred to as compound devices, because they require you to specify a file name in order for them to work.
The next section shows you how tough it would be to turn your simple device player into a compound one.
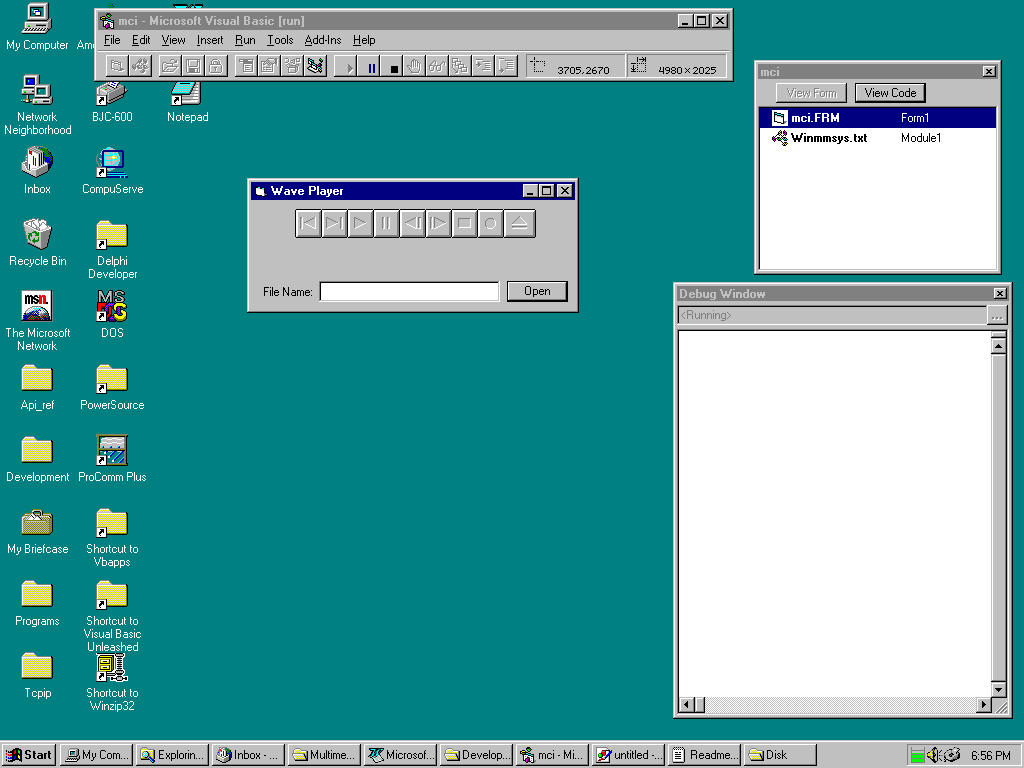
The next task is to create a WAV player. You should begin with your CD player as a base. You might want to save the project and files to a different name if you want to keep your CD player intact. When you are ready, follow these steps:
Figure 9.4. Moving things around to create a Wave player application.
Private Sub Form_Load()

MMControl1.DeviceType = "WaveAudio"

End Sub
Private Sub cmdOpen_Click()

MMControl1.filename = txtFileName.TEXT

MMControl1.Command = "Open"

End Sub
Private Sub MMControl1_StatusUpdate()

If MMControl1.Mode = MCI_MODE_NOT_READY Then

    lblStatus.Caption = "Not Ready"

ElseIf MMControl1.Mode = MCI_MODE_STOP Then

    lblStatus.Caption = "Stop"

ElseIf MMControl1.Mode = MCI_MODE_PLAY Then

    lblStatus.Caption = "Play"

ElseIf MMControl1.Mode = MCI_MODE_RECORD Then

    lblStatus.Caption = "Record"

ElseIf MMControl1.Mode = MCI_MODE_SEEK Then

    lblStatus.Caption = "Seek"

ElseIf MMControl1.Mode = MCI_MODE_PAUSE Then

    lblStatus.Caption = "Pause"

ElseIf MMControl1.Mode = MCI_MODE_OPEN Then

    lblStatus.Caption = "Open"

End If

End Sub
Figure 9.5. The Wave Player application.
Notice one other thing. There is another button that is enabled that wasn't enabled for the audio CD player. The big round circle. Yes, this is the Record button. You also can use your new little utility to record WAV files. Actually, you have no way of
creating new wave files (that would take some more work), but you can record at the beginning or end of the sound file in memory and then play it back. But again, you don't have any way of saving the recording back out as it is right now. You'll see how
you would go about saving recordings as new WAV files later in this chapter.
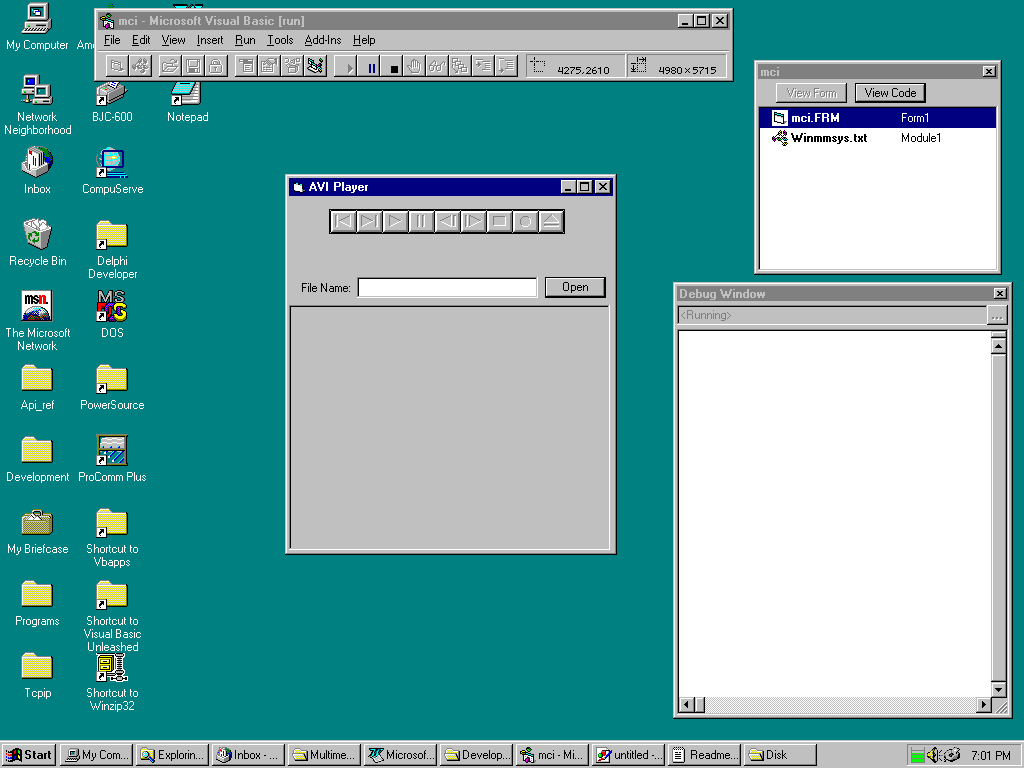
On to bigger and better players. The MCI control can do more than make your sound card chirp. It actually can play back video for your viewing pleasure. The first question you no doubt will be asking is, "Where, exactly, does it play this
video?" Do you punch a button and it grows a screen to project it on?
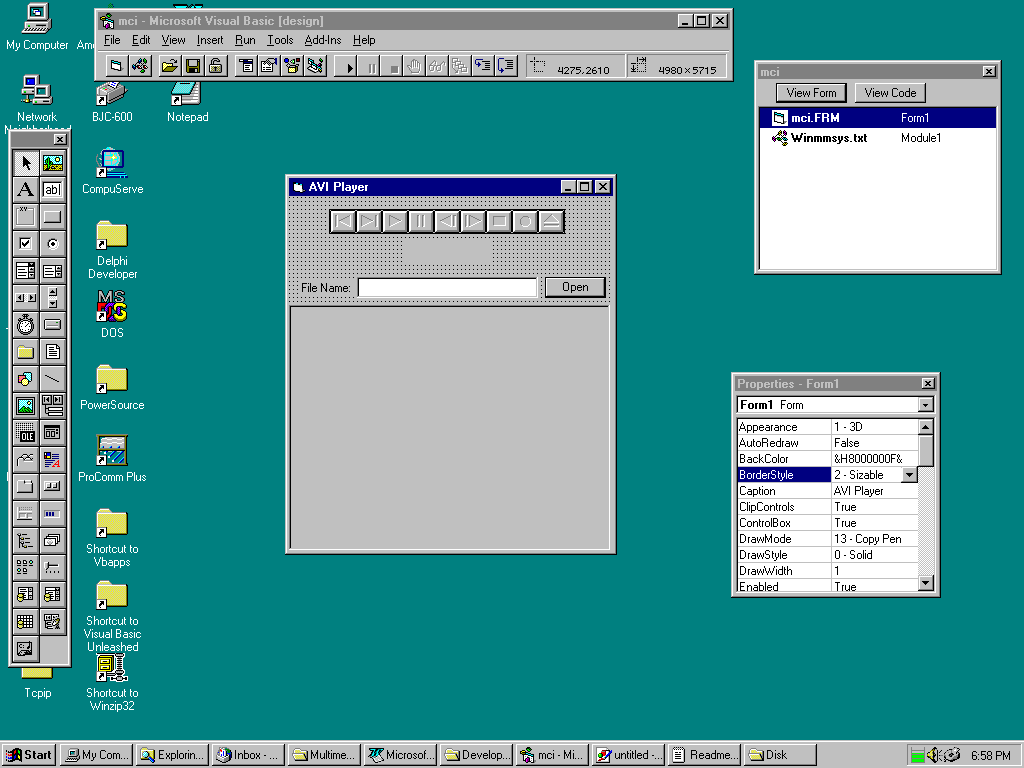
Not exactly. The fact is that you need to drop another control on the form. A picture control. Then you connect the picture control to the MCI and it plays the video there.
To play back your video, follow these steps:
Figure 9.6. The AVI video player form.
Private Sub Form_Load()

MMControl1.DeviceType = "AVIVideo"

MMControl1.hWndDisplay = picVid.hWnd

End Sub
Figure 9.7. Running the AVI video player.
Or, type any file name that you happen to have on your hard drive or CD-ROM. It's just that easy.
So far, you have learned about the fundamental functionality available with the MCI control. You can take advantage of many more attributes and events, however, to enhance your multimedia application. In this section, you will learn about the most
important enhancements you can make.
Earlier in this chapter, you learned that when AutoEnable is set to True, it turns over the handling of the appropriate enabling and disabling of the individual buttons on the MCI control to the system. Normally, you want AutoEnable to be True. If you
set AutoEnable to False, you can use the ButtonEnable properties to set the buttons yourself. (No ButtonEnable property actually exists. ButtonEnable is just an easy way to refer collectively to these nine properties: BackEnable, EjectEnable,
NextEnable, PauseEnable, PlayEnable, PrevEnable, RecordEnable, StepEnable, and StopEnable.) Keep in mind that if the AutoEnable property is set to True, it overrides any ButtonEnable property settings you have explicitly set yourself. In other
words, if you want to use the ButtonEnable properties, you'll have to set AutoEnable to False.
Regardless of whether you handle the enabling and disabling of the buttons or you let AutoEnable handle it for you, there will be times when you want a button to be completely invisible. The ButtonVisible properties enable you to make a button
invisible. Again, ButtonVisible is shorthand for the collection of visible properties associated with each button.
A Visible property and Enabled property also exist for the entire control. These properties supersede all the Button properties and the AutoEnable property.
You've seen these properties already. You used DeviceType to specify what type of device you would be opening for each of the different players. For the audio CD player, you used CDAudio; for the Wave player, you used WaveAudio. And for the AVI player,
you used AVIVideo. The other possible values for the DeviceType property are DAT, DigitalVideo, MMMovie, Other, Overlay, Scanner, Sequencer, VCR, and Videodisc.
FileName, of course, is used with compound devices to indicate which file they should use.
As you saw from the MCI control projects earlier, at every UpdateInterval (specified in milliseconds), the StatusUpdate event is triggered. This event generally is used to update status displays on-screen, such as the mode in which you are working.
Mode gives you the current mode the MCI device is in, such as Stop, Play, Record, Pause, and so on. Mode is read-only and is available only at runtime.
Other attributes often displayed in the StatusUpdate event are Track, Tracks, Length, Position, TrackLength, and TrackPosition.
You've seen these properties before in this chapter. These determine the current track and the number of the final track. Track can be set to change the current track. Tracks is read-only. Both properties are available only at runtime.
The UsesWindows property tells you whether the current device uses a window (or picture control) to present its output. This property is True for MMMovie, Overlay, VCR, or AVIVideo.
The hWndDisplay property, as you saw in the AVI player example, specifies which control displays the output. You always assign another control's hWnd property to this property.
The Orientation property tells Visual Basic to lay out the buttons horizontally (0, the default) or vertically (1).
This property works like a Mute button. Set it to True, and all sound stops.
The MCI control has several properties that give you information about the capabilities of the device with which you are working. These properties are CanEject, CanPlay, CanRecord, and CanStep. They are each simple True/False variables and can be read
only at runtime.
In addition, you can use the DeviceID property to determine the ID of the currently open device at runtime.
When you record to a medium, you can use the RecordMode property to specify that it insert the recorded material in the middle of what's there (0) or simply overwrite it (1). You can tell whether a medium is recordable by enabling CanRecord, but no
attribute exists to let you know whether the medium supports Insert, Overwrite, or both modes. You just have to try it; if one mode fails, try the other mode. Nifty. I can tell you that WAVs can support only Insert mode, and one would assume that VCRs
would support only Overwrite mode. From there, you're on your own.
Many properties are set using values based on the current TimeFormat. The TimeFormat property enables you to specify how you want to reference points in your media. Certain time formats make sense with certain media. If you assign a format with a media
that doesn't make sense, the assignment is ignored. Table 9.1 lists the acceptable values for TimeFormat.
Constant |
Value |
Meaning |
|
mci_Format_Milliseconds |
0 |
Milliseconds |
|
mci_Format_Hms |
1 |
Hours, minutes, seconds |
|
mci_Format_Msf |
2 |
Minutes, seconds, frames |
|
mci_Format_Frames |
3 |
Frames |
|
mci_Format_Smpte_24 |
4 |
24-frame SMPTE: Hours, minutes, seconds, frames |
|
mci_Format_Smpte_25 |
5 |
25-frame SMPTE: Hours, minutes, seconds, frames |
|
mci_Format_Smpte_30 |
6 |
30-frame SMPTE: Hours, minutes, seconds, frames |
|
mci_Format_Smpte_30Drop |
7 |
30-drop-frame SMPTE: Hours, minutes, seconds, frames |
|
mci_Format_Bytes |
8 |
Number of bytes |
|
mci_Format_Samples |
9 |
Number of samples |
|
mci_Format_Tmsf |
10 |
Tracks, minutes, seconds, frames |
Each of these formats stores its data in a four-byte integer. It is up to you to decode it. For example, mci_Format_Hms stores the hours, minutes, and seconds from the least-significant byte to the most-significant byte in a four-byte Long value.
If you were checking the position at 1 hour, 5 minutes, and 3 seconds, for example, it would be stored like the following:
[murphy] |
Most-Significant Byte 4 |
Byte 3 |
Byte 2 |
Least-Significant Byte 1 |
|
Decimal |
0 |
3 |
5 |
1 |
|
Binary |
00000000 |
00000011 |
00000101 |
00000001 |
If this looks backward to you, remember that numbers generally are read from right to left. The least-significant digit (the 1s, in decimal) always is the farthest to the right, and the digits become larger and larger (tens, hundreds, and so on) as you
move to the left. This process also is used with binary numbers.
The problem is, when you check the value of the Long number, it is 197889. That's because the bytes are taken together to mean one really Long binary value. The decimal values for each of the On bits add up like this:
1 + 256 + 1024 + 65536 + 131072 = 197889
(I just love binary math.)
But the value 197889 is useless to us. How do we pry 1 hour, 5 minutes, and 3 seconds out of it? This sort of storage scheme is common for Win32 functions, and you see it more and more now in Visual Basic's native functions, too. The problem is, there
is no built-in function for extracting individual byte values out of a four-byte Long value. Because this need is becoming so common, I will spend a little time here showing you how to do it. It isn't difficult, but it isn't immediately obvious, either.
All it takes is a little bit masking and some division. Bit masking is a way of pulling just the data you want out of a Long binary number, which happens to be just what we want to do.
To see the lowest order byte of the number in this example (the hours), you can take the following approach:
|
Binary: |
00000000 |
00000011 |
00000101 |
00000001 |
|
AND |
00000000 |
00000000 |
00000000 |
01111111 |
|
_______________________________________________________________ | ||||
|
[murphy] |
00000000 |
00000000 |
00000000 |
00000001 |
An AND logical operator only allows a bit in the result if both the corresponding bits in the problem are 1. By doing an AND with a number that only has 1s in the least-significant byte, you get only the value from that byte. By the way, you only want
to check the first seven bits. The eighth bit is the sign, and you won't be getting signed values back under normal circumstances.
And the answer is 1. One hour. One down, two to go.
Can you use the same trick for the minutes?
|
Binary: |
00000000 |
00000011 |
00000101 |
00000001 |
|
AND |
00000000 |
00000000 |
01111111 |
00000000 |
|
_______________________________________________________________ | ||||
|
[murphy] |
00000000 |
00000000 |
00000101 |
00000000 |
Well, you masked out all the other bytes, but the value is still 1280 (256 + 1024). You need to shift the byte over to the least-significant value position. How do you do it? Well, if you wanted to shift the 7 in 700 to the lowest position, what would
you do? Divide by 100. That would give you 7.
So you just need to divide by 100000000 (binary) or 256. 1280 divided by 256 equals 5. That's it! Five minutes. One more.
|
Binary: |
00000000 |
00000011 |
00000101 |
00000001 |
|
AND |
00000000 |
01111111 |
00000000 |
00000000 |
|
______________________________________________________________ | ||||
|
[murphy]
|
00000000
|
00000011
|
00000000
|
00000000 |
Got the byte. 196608 is the number. Now divide by binary 10000000000000000 (16 zeros—count 'em). That's 65536 in decimal. 196608 divided by 65536 equals 3. One hour, five minutes, and three seconds. Cool.
But that seems like a lot of work just to get the position. Why couldn't they make it easier? They could have. But there is always the trade-off between efficiency and programming simplicity. This time, the programmers opted for efficiency. You can
easily turn this into a function. Add Listing 9.8 to your library.
Public Function ByteFromLong(LongVal As Long, Position As Integer) As Integer

Dim iTemp As Long

If Position < 1 Or Position > 4 Then

   ByteFromLong = —1

   Exit Function

End If

Select Case Position

Case 1

   ' 127 = Binary 01111111

   iTemp = LongVal And 127

Case 2

   ' 32512 = Binary 01111111 00000000

   iTemp = LongVal And 32512

   ' 256 = Binary 1 00000000

   iTemp = iTemp / 256

Case 3

   ' 8323072 = Binary 01111111 00000000 00000000

   iTemp = LongVal And 8323072

   ' 65536 = Binary 1 00000000 00000000

   iTemp = iTemp / 65536

Case 4

   ' 2130706432 = Binary 01111111 00000000 00000000 00000000

   iTemp = LongVal And 2130706432

   ' 16777216 = Binary 1 00000000 00000000 00000000

   iTemp = iTemp / 16777216

End Select

ByteFromLong = iTemp

End Function
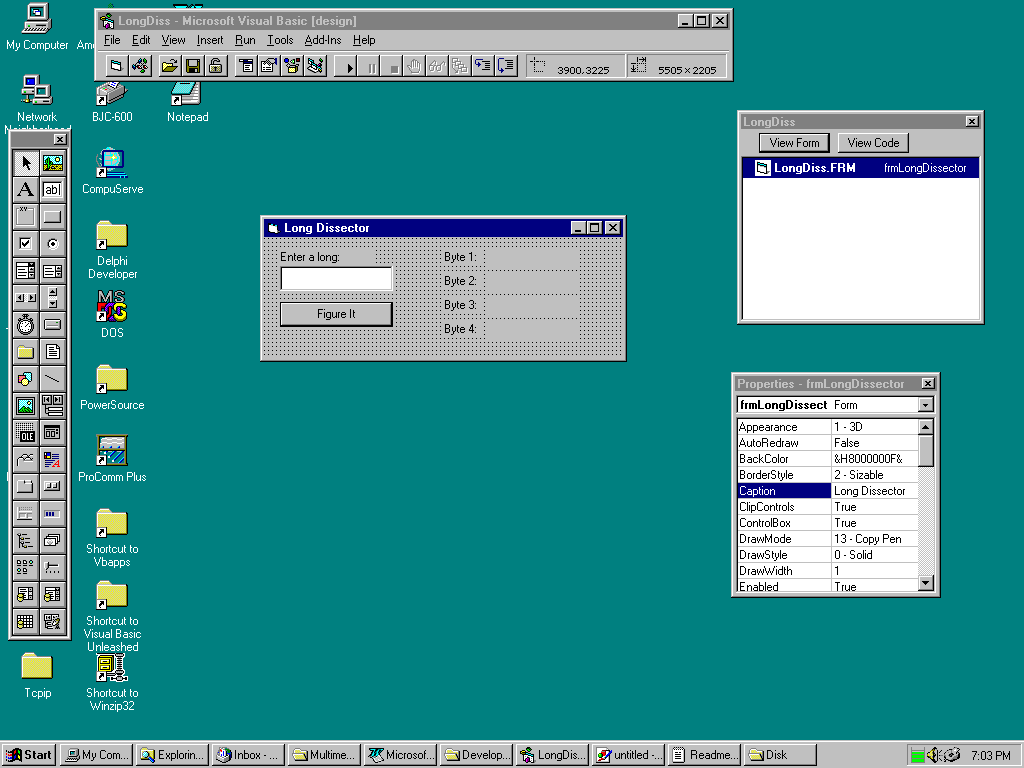
On the CD that comes with this book, you will find this function as part of an application called LongDissector. The form looks like Figure 9.8.
Figure 9.8. The form for LongDissector.
The button's Click event uses the ByteFromLong function, as you can see in Listing 9.9.
Private Sub cmdFigureIt_Click()

Dim iLong As Long

iLong = Val(txtLong.TEXT)

lblByte1.Caption = Str(ByteFromLong(iLong, 1))

lblByte2.Caption = Str(ByteFromLong(iLong, 2))

lblByte3.Caption = Str(ByteFromLong(iLong, 3))

lblByte4.Caption = Str(ByteFromLong(iLong, 4))

End Sub
Now you easily can extract information out of a Long value for all the functions that return a value based on the TimeFormat (just as you can for any other functions in Visual Basic or Win32 that use this type of return value).
These properties can be set with values to indicate a portion of media that should be played. From and To enable you to play a snippet from the middle of a WAV or a single scene from an AVI video. You also can use From and To with the Record command.
The From and To property definitions apply only to the next command given.
These properties are specified in the format set by TimeFormat. To assign a value to these properties, you might need to pack your own Long value with specific bytes of information. You must modify the function shown in Listing 9.9 to allow it to assign
a value to a given byte, rather than to retrieve it. I'll leave this one up to you to try.
As their names imply, these properties give you the length and position of the currently open media or the currently specified track. Start gives you the starting position of the current media.
These properties are all read-only and available only at runtime.
Notify is a Boolean that can be set to True to cause the next command to perform a callback when it is done—that is, the Done event is triggered when the next command completes its task. The Notify assignment applies only to the next command
issued. If Notify is not specified before a command, that command uses its default notification. The default notification is different for each command (see "Commands and Errors," later in this chapter).
NotifyValue and NotifyMessage can be accessed in the Done event to find out exactly how the last command went. You can determine whether it was successful, whether it was aborted by the user, or whether it failed for some reason. Table 9.2 lists the
constants associated with NotifyValue.
Constant |
Value |
Meaning |
|
mci_Notify_Successful |
1 |
Completed successfully |
|
mci_Notify_Superseded |
2 |
Another command overrode this one. |
|
mci_Notify_Aborted |
4 |
Aborted by the user |
|
mci_Notify_Failure |
8 |
Failed |
NotifyMessage is simply a textual description of NotifyValue. It is handy for dropping into a message box or a status bar.
Wait determines whether the next command waits until it finishes its processing before returning control to the application. The default depends on the command executed (see "Commands and Errors," later in this chapter, for a list of the
commands).
This Boolean enables you to specify whether other applications can share the currently open device.
The Command property is not used to set a value or to specify the way things should be carried out, as most properties are used. Command is a special way to tell the MCI control to do something. You already saw the most commonly used commands in the
examples earlier in this chapter. In this section, I will talk briefly about each command, how it works, and what it impacts.
These commands open and close the device specified in DeviceName. If it is a compound device, FileName is used to locate the associated file.
These commands play from or record to the media. Play and Record look at the From and To properties and use the values specified there to locate the media and to determine how much of the media to work on. Record also uses RecordMode to determine
whether it should insert or overwrite the new information.
Pause pauses the playback or recording. If this command is executed while in Pause mode, it acts as a toggle and attempts to resume whatever it was doing before.
Stop stops playing or recording.
Back and Step act like a Rewind and Fast Forward button on the current track. You can use the Frames property to fine-tune how far back and forward these commands take you.
Prev and Next move to the start of the current track and to the next track.
Seek moves the current location (whether the MCI control is currently playing or not) to the place specified in the To property. If it is playing, it continues playing at the new position.
This command ejects the media.
This command plays a sound specified in FileName.
This command saves a currently open file on a compound device to the file name specified in FileName. This is what you would have needed to make the recording session with your Wave player worthwhile.
The Notify and Wait properties affect the next command given. You only need to use them, though, when you want the next command to work differently than it normally works. Table 9.3 lists the default behavior for each command.
Command |
Default Notify |
Default Wait |
|
Back |
False |
True |
|
Close |
False |
True |
|
Eject |
False |
True |
|
Next |
False |
True |
|
Open |
False |
True |
|
Pause |
False |
True |
|
Play |
True |
False |
|
Prev |
False |
True |
|
Record |
True |
False |
|
Save |
False |
True |
|
Seek |
False |
True |
|
Sound |
False |
False |
|
Step |
False |
True |
|
Stop |
False |
True |
Error and ErrorMessage hold the error number and error description (respectively) for the last MCI command. If there was no error, Error is zero.
Consensus has it that the MCI control doesn't win any awards for beauty. But it is highly functional. And it makes something that could be very difficult very easy. To work around this appearance problem, some developers simply use the MCI control with
its Visible property set to False. Any commands they want to offer to the user are provided through the developer's user interface, which is, presumably, much more attractive. Then the properties of the control are manipulated in code behind the scenes.
This is a perfectly workable solution and gives you a lot of flexibility without tying you to visual controls.
If you want to go to the next level, though, you can access the MCI through Win32's multimedia API. Specifically, you can use the mciSendString function. Listing 9.10 shows the declaration.
Declare Function mciSendString Lib "winmm" _

(ByVal lpstrCommand As String, _

ByVal lpstrReturnString As String, _

ByVal uReturnLength As Integer, _

ByVal hWndCallback As Integer) As Long
The lpstrCommand argument is where you send the actual command (like Play, Stop, or Record). lpstrReturnString is where you receive information back from the multimedia system (like status information requested), and uReturnLength is where you pass the
length of the string. (Actually, you want to pass the length minus 1 so that there is room for the string ending character.)
Finally, hWndCallback is the hWnd pointer to a window that will receive the callback function. This is analogous to the Notify property and the Done event of the control. Unless you trap for the mm_Mcinotify for a particular window (using a third-party
tool to trap events Visual Basic doesn't normally trap) and then pass that window's hWnd property here, however, you won't be able to take advantage of it.
mciSendString returns a value if there was an error, or 0 if everything went fine. There are a large number of possible error codes that can be returned. For a complete list, open WINMMSYS.TXT (in your WinAPI directory) and search for
MCIERR_INVALID_DEVICE_ID. This is the first error code. A long list follows this first error code.
After you declare the function, you are ready to put it to use. Listing 9.11 provides an example bit of code that opens the audio CD player and begins playing. It also shows you some status updates with the message box.
Dim ReturnString As String

Dim rc As Integer

'Always set your string size before sending to a DLL

ReturnString = String(128, " ")

' Opens the audio CD device.

rc = mciSendString("open CDAudio", ReturnString, 127, 0)

' Plays an audio CD.

rc = mciSendString("play CDAudio", ReturnString, 127, 0)

' Request the mode be returned

rc = mciSendString("status CDAudio mode", _

   ReturnString, 127, 0)

MsgBox (ReturnString)

' Returns the number of tracks on the current audio CD

rc = mciSendString("status CDAudio number of tracks", _

   ReturnString, 127, 0)

MsgBox (ReturnString)

' Closes the audio CD device.

rc = mciSendString("close CDAudio", ReturnString, 127, 0)
The commands you can specify in the lpstrCommand string can be quite extensive. The commands and options available depend on the device. Because there's no way I can provide an exhaustive list here of all the things you can do, I will show you some
examples of common strings you might want to try in Listing 9.12. This isn't intended to be a sequential listing, but rather a list of separate examples of strings that you could use to control all different kinds of devices.
play c:\windows\media\chimes.wav

open new type WaveAudio alias wave

set wave bitpersample 8

set wave samplespersec 11025

set wave channels 2

record wave

stop wave

save wave c:\mywave\mywave.wav

close wave

capability WaveAudio can save

capability CDAudio can reverse

capability AVIVideo has audio

open c:\vid.avi

play WaveAudio

play VCR fast

play VCR reverse

play VCR slow

resume CDAudio

seek CDAudio to start

set CDAudio left off

set AVIVideo time format SMPTE 24

status WaveAudio bitspersample

status CDAudio length

status CDAudio length track 5

status VCR media present

stop VCR
If you want a more complete list of available MCI commands, see Microsoft's Multimedia Programmer's Reference.
Keep in mind that more and more consumer audio and video equipment now supports MCI. So the next time you go out to buy a video disc player or a do-everything VCR or DAT tape deck, you might want to check whether it supports MCI. If you buy equipment
that does support MCI, you usually can install it on a serial port.
In this chapter, you began by creating several complete multimedia players that easily went together, thanks to Visual Basic's MCI control. Then you dove deeper into the control to learn about all its rich features and capabilities. Finally, you finished by going one level deeper—using the mciSendString Win32 function. This function enabled you to send English-like strings directly to the MCI to control all the devices the MCI control accessed.
![]()
![]()
![]()